Quickstart
This guide lets you implement Video Calling in your Android app using the Agora Video SDK.
Overview
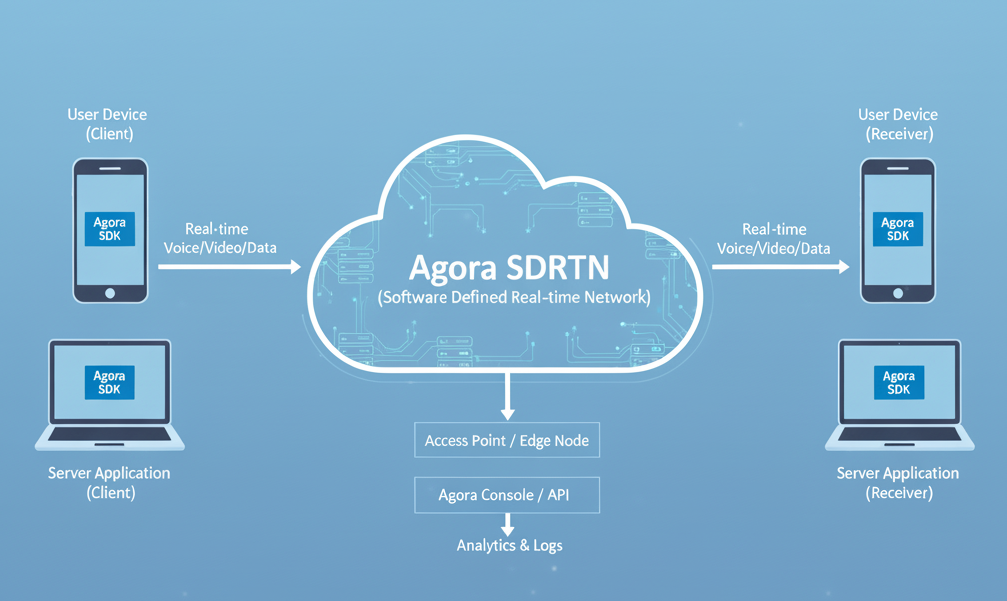
The image shows how the Agora SDK connects your application to the Agora network. Think of it as a simple, two-step process:
-
User devices to Agora: The Agora SDK is the piece of software in your app that captures real-time video, audio, and data. It sends this information to the Agora Software Defined Real-time Network (SDRTN) through the closest Access Point or Edge Node.
-
Agora to user devices: Once the data hits the SDRTN, the network takes over. It uses a Global Mesh Network to quickly route the information to the other user's app, delivering it in real-time.
Essentially, the diagram illustrates the data flow from your device to SDRTN and out to the other users.
Project setup
This section shows you how to set up your Android project:
- Create a new project
- Add to an existing project
Create a new project.
- Open Android Studio and select File > New > New Project....
- Select Phone and Tablet > Empty Activity and click Next.
- Set the project name and storage path.
- Select Java or Kotlin as the language, and click Finish to create the Android project.
Note: After you create a project, Android Studio automatically starts gradle sync. Ensure that the synchronization is successful before proceeding to the next step.
Add a new activity to your project.
- Open your project in Android Studio.
- Right-click on the
app/src/main/java/<your.package.name>folder. - Select New → Activity → Empty Activity.
- Enter an activity name and click Finish.
This guide uses
MainActivityas the activity name in the sample code. Replace it with your activity name where required.
Integrate the SDK
Use either of the following methods to add the Video SDK to your project.
- Maven Central
- Manual integration
-
Open the
settings.gradlefile in the project's root directory and add the Maven Central dependency, if it doesn't already exist:repositories {
mavenCentral()
} -
To integrate the Video SDK into your Android project, add the following to the
dependenciesblock in your project modulebuild.gradlefile:-
Groovy
build.gradleimplementation 'io.agora.rtc:full-sdk:x.y.z' -
Kotlin
build.gradle.ktsimplementation("io.agora.rtc:full-sdk:x.y.z")
Replace
x.y.zwith the specific SDK version number, such as4.6.0. -
-
Prevent code obfuscation
Open the
/app/proguard-rules.profile and add the following lines to prevent the Video SDK code from being obfuscated:-keep class io.agora.** { *; }
-dontwarn io.agora.**
-
Download the latest version of Video SDK from the the SDKs page and unzip it.
-
Open the unzipped file and copy the following files or subfolders to your project path.
File or folder Project path agora-rtc-sdk.jarfile/app/libs/arm64-v8afolder/app/src/main/jniLibs/armeabi-v7afolder/app/src/main/jniLibs/x86folder/app/src/main/jniLibs/x86_64folder/app/src/main/jniLibs/high_level_apiinincludefolder/app/src/main/jniLibs/ -
Select the file
/app/libs/agora-rtc-sdk.jarin the left navigation bar of Android Studio project files, right-click, and select add as a library from the drop-down menu. -
Prevent code obfuscation
Open the
/app/proguard-rules.profile and add the following lines to prevent the Video SDK code from being obfuscated:-keep class io.agora.** { *; }
-dontwarn io.agora.**
Implement the logic
Follow these steps to implement video calling.
1. Set up the UI
Add frames for local and remote video in /app/res/layout/activity_main.xml:
<?xml version="1.0" encoding="UTF-8"?>
<RelativeLayout xmlns:android="http://schemas.android.com/apk/res/android"
    xmlns:tools="http://schemas.android.com/tools"
    android:id="@+id/activity_main"
    android:layout_width="match_parent"
    android:layout_height="match_parent"
    tools:context=".MainActivity">

    <FrameLayout
        android:id="@+id/local_video_view_container"
        android:layout_width="match_parent"
        android:layout_height="match_parent"
        android:background="@android:color/white" />

    <FrameLayout
        android:id="@+id/remote_video_view_container"
        android:layout_width="160dp"
        android:layout_height="160dp"
        android:layout_alignParentEnd="true"
        android:layout_alignParentRight="true"
        android:layout_alignParentTop="true"
        android:layout_marginEnd="16dp"
        android:layout_marginRight="16dp"
        android:layout_marginTop="16dp"
        android:background="@android:color/darker_gray" />

</RelativeLayout>
2. Add the required variables
In MainActivity:
companion object {
    private const val PERMISSION_REQ_ID = 22
}
private val myAppId = "<Your app ID>"
private val channelName = "<Your channel name>"
private val token = "<Your token>"
private var mRtcEngine: RtcEngine? = null
3. Request microphone and camera permissions
When your app starts, request the required permissions. if granted, call initializeAgoraVideoSDK to start Video Calling. To implement this logic, do the following:
-
Add these permissions to
AndroidManifest.xmlbefore<application>:<uses-feature android:name="android.hardware.camera" android:required="false" />
<!--Required permissions-->
<uses-permission android:name="android.permission.INTERNET"/>
<uses-permission android:name="android.permission.CAMERA"/>
<uses-permission android:name="android.permission.RECORD_AUDIO"/>
<uses-permission android:name="android.permission.MODIFY_AUDIO_SETTINGS"/>
<!--Optional permissions-->
<uses-permission android:name="android.permission.ACCESS_WIFI_STATE"/>
<uses-permission android:name="android.permission.ACCESS_NETWORK_STATE"/>
<uses-permission android:name="android.permission.BLUETOOTH"/>
<!-- For devices running Android 12 (API level 32) or higher and integrating Agora Video SDK version v4.1.0 or lower, you also need to add the following permissions -->
<uses-permission android:name="android.permission.BLUETOOTH_CONNECT"/>
<!-- For Android 12.0 or higher, the following permissions are also required -->
<uses-permission android:name="android.permission.READ_PHONE_STATE"/>
<uses-permission android:name="android.permission.BLUETOOTH_SCAN"/> -
In
/app/java/com.example.<projectname>/MainActivity, add the following to theMainActivityclass:private fun checkPermissions(): Boolean {
return getRequiredPermissions().all {
ContextCompat.checkSelfPermission(this, it) == PackageManager.PERMISSION_GRANTED
}
}
private fun getRequiredPermissions(): Array<String> {
return if (android.os.Build.VERSION.SDK_INT >= android.os.Build.VERSION_CODES.S) {
arrayOf(
Manifest.permission.RECORD_AUDIO,
Manifest.permission.CAMERA,
Manifest.permission.READ_PHONE_STATE,
Manifest.permission.BLUETOOTH_CONNECT
)
} else {
arrayOf(
Manifest.permission.RECORD_AUDIO,
Manifest.permission.CAMERA
)
}
}
override fun onRequestPermissionsResult(
requestCode: Int,
permissions: Array<out String>,
grantResults: IntArray
) {
super.onRequestPermissionsResult(requestCode, permissions, grantResults)
if (requestCode == PERMISSION_REQ_ID && checkPermissions()) {
startVideoCalling()
}
}
4. Initialize the SDK
In MainActivity, add the following before onRequestPermissionsResult:
private fun initializeAgoraVideoSDK() {
  try {
      val config = RtcEngineConfig().apply {
          mContext = applicationContext
          mAppId = myAppId
          mEventHandler = mRtcEventHandler
      }
      mRtcEngine = RtcEngine.create(config)
  } catch (e: Exception) {
      throw RuntimeException("Error initializing RTC engine: ${e.message}")
  }
}
5. Enable the local video
Before you join a channel, configure the local video source. Call enableVideo and startPreview to enable the video source and keep the camera ready for Video Calling. To implement this logic, add the following to the MainActivity class:
private fun enableVideo() {
  mRtcEngine?.apply {
      enableVideo()
      startPreview()
  }
}
6. Display the local video
To render the local camera feed on a SurfaceView, in MainActivity, add the following
private fun setupLocalVideo() {
  val container: FrameLayout = findViewById(R.id.local_video_view_container)
  val surfaceView = SurfaceView(baseContext)
  container.addView(surfaceView)
  mRtcEngine?.setupLocalVideo(VideoCanvas(surfaceView, VideoCanvas.RENDER_MODE_FIT, 0))
}
At this point, you are ready to join a channel.
7. Join the channel
To join a channel, you need a valid authentication token and channel name. In MainActivity, add this function to handle the join operation:
    private fun joinChannel() {
  val options = ChannelMediaOptions().apply {
      clientRoleType = Constants.CLIENT_ROLE_BROADCASTER
      channelProfile = Constants.CHANNEL_PROFILE_COMMUNICATION
      publishMicrophoneTrack = true
      publishCameraTrack = true
  }
  mRtcEngine?.joinChannel(token, channelName, 0, options)
}
8. Dislay the remote view
When a remote user joins, the app must render their video stream. The event handler calls this method to display the remote feed:
private fun setupRemoteVideo(uid: Int) {
  val container: FrameLayout = findViewById(R.id.remote_video_view_container)
  val surfaceView = SurfaceView(applicationContext).apply {
      setZOrderMediaOverlay(true)
      container.addView(this)
  }
  mRtcEngine?.setupRemoteVideo(VideoCanvas(surfaceView, VideoCanvas.RENDER_MODE_FIT, uid))
}
9. Leave the channel
When the call ends, clean up resources by leaving the channel and stopping the preview. Add this method to MainActivity:
private fun cleanupAgoraEngine() {
  mRtcEngine?.apply {
      stopPreview()
      leaveChannel()
  }
  mRtcEngine = null
}
Test the app
To test this project, take the following steps:
-
Replace the
myAppId,channelName, andtokenwith values from Agora Console. -
Run the app on a simulator or physical device in Android Studio.
-
Grant the required permissions when prompted.
-
The local video appears on the screen.
-
Install the same app on another device and join the same channel. You should see both local and remote video streams.